
If you run a candle, soap, jewelry, bakery, cosmetics, or other product-based small business, professional packaging can make your products look far more established—even when you are producing in small quantities.
The difficult part is turning your branding into a file that a printer can actually use.
That is where Adobe Illustrator for packaging design becomes especially useful.
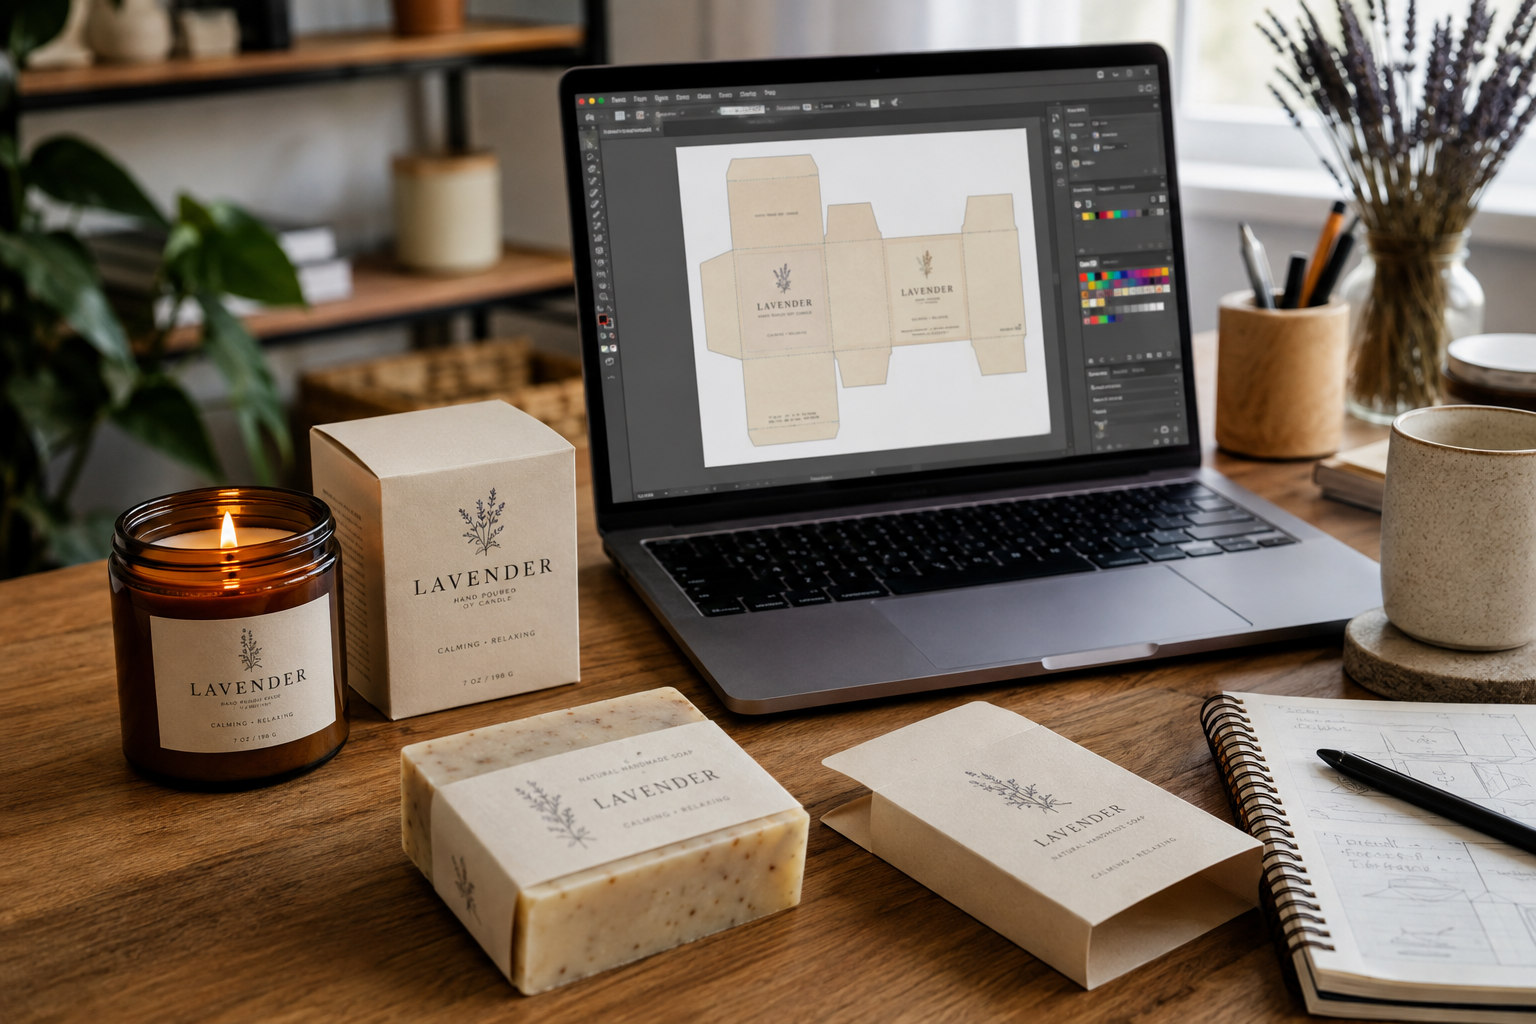
Illustrator gives you precise control over packaging dimensions, dielines, typography, colors, logos, bleed, fold lines, and print-ready artwork. You can use it to design anything from a simple product sleeve or candle box to labels, folding cartons, mailer boxes, and other custom packaging.
You do not need to become an advanced graphic designer to use Illustrator for your small business, either.
For most DIY packaging projects, you mainly need to understand the packaging workflow:
Choose the packaging size → get the correct dieline → add your artwork → check bleed and safe areas → prepare colors and images → review a prototype → export the print-ready file.
For packaging size in Illustrator, work from the final physical dimensions of the package and a dieline built at 100% scale. Keep the cut, fold, bleed, and safe-area guides accurate; do not resize the artwork or structural template by eye after the dieline has been set.
This guide walks through that process step by step.
Quick Answer: Is Adobe Illustrator Good for Packaging Design?
Yes. Adobe Illustrator is one of the best tools for creating professional packaging artwork because it combines precise vector design with the technical controls needed for commercial printing.
You can use Illustrator to:
- Design directly on packaging dielines
- Create logos, icons, patterns, and illustrations
- Position artwork using exact measurements
- Prepare CMYK colors
- Add bleed and safe areas
- Separate cut, fold, and artwork layers
- Create product labels and packaging graphics — see our step-by-step guide to making stickers in Adobe Illustrator
- Prepare files for professional printing
- Export print-ready PDFs
For a small business, Illustrator is particularly useful when your packaging has moved beyond simple online templates and you need more control over how the final printed product will look.
However, Illustrator is not always the easiest choice for every packaging task.
If you only need simple labels or basic branding graphics, Canva may be easier. If you mainly need packaging templates and quick 3D mockups, a packaging-focused tool such as Pacdora may be faster.
But when you need precise packaging artwork that will eventually be printed, Illustrator gives you much more control.
If you are still deciding which design tool fits your workflow, compare the best packaging software for small business to see how Adobe Illustrator compares with Canva and packaging-specific tools such as Pacdora.
What Is Adobe Illustrator Used for in Packaging Design?
Adobe Illustrator is used to create precise, print-ready packaging artwork, including dielines, vector graphics, typography, colors, bleed, fold lines, and production-ready files
Packaging design involves more than making a box look attractive.
The design file must communicate both your branding and the technical information required to manufacture the packaging correctly.
A typical packaging file may contain:
Creative Elements
- Logo
- Product name
- Brand colors
- Typography
- Illustrations
- Patterns
- Icons
- Product information
- Ingredients
- Instructions
- Barcodes
- Social media or website details
Production Elements
- Dieline
- Cut lines
- Fold or crease lines
- Glue areas
- Bleed
- Safe zones
- Spot colors
- Printer instructions
Illustrator allows these elements to be organized into separate layers while keeping the entire design editable.
That is one of the main reasons it is so widely used for packaging artwork.
Packaging You Can Design in Illustrator
Small product-based businesses can use Illustrator to create:
- Candle boxes
- Soap boxes
- Cosmetic cartons
- Bakery packaging
- Food packaging
- Jewelry boxes
- Product sleeves
- Bottle labels
- Jar labels
- Stickers
- Mailer boxes
- Inserts
- Hang tags
- Subscription boxes
The exact packaging may change, but the basic design process is usually very similar.
How to Create Packaging Design in Adobe Illustrator: Step by Step
If this is your first packaging project, the process becomes much easier when you separate the structural packaging from the visual design.
Do not start by drawing a random box in Illustrator.
Start with the actual product.
Step 1: Measure Your Product
Before designing anything, determine the size of the product that will go inside the packaging.
Measure:
- Width
- Height
- Depth
Also consider any additional space needed for:
- Tissue paper
- Inserts
- Protective padding
- Product cards
- Instructions
- Multiple products
For example, if you sell handmade candles, measure the candle container itself before choosing the carton.
A box that is too tight can damage the product, while an unnecessarily large box increases packaging and shipping costs.
This is especially important for small businesses ordering packaging in smaller quantities, where every packaging mistake affects your cost per product.
Step 2: Choose the Packaging Style
Next, decide what type of packaging your product actually needs.
For example:
Candles
- Folding cartons
- Kraft boxes
- Mailer boxes
- Product sleeves
Soap
- Soap sleeves
- Folding boxes
- Kraft cartons
- Belly bands
Jewelry
- Small mailer boxes
- Pillow boxes
- Folding cartons
- Inserts and cards
Bakery products
- Window boxes
- Folding cartons
- Food-safe paper boxes
- Sleeves
Do not choose packaging based only on appearance.
Think about:
- Product protection
- Shipping method
- Storage
- Cost
- Minimum order quantity
- Assembly time
- Customer unboxing experience
For many home-based businesses, a simple stock box combined with a professionally designed label, sleeve, or insert can look excellent without requiring expensive custom manufacturing.
If you are still deciding how to package your products without committing to expensive custom manufacturing, explore these packaging ideas for small business for practical ways to combine stock boxes, labels, tissue paper, sleeves, and other affordable branding elements.
Step 3: Get the Correct Packaging Dieline
A dieline is the flat template that shows how your packaging will be cut, folded, and assembled.
It acts as the structural map for your design.
A dieline typically includes:
- Cut lines
- Fold lines
- Glue tabs
- Panels
- Bleed areas
- Safe zones
If you are ordering custom packaging from a printer or manufacturer, ask them for the exact dieline before designing your artwork. For a practical example of measuring packaging before choosing a dieline, see our candle box size guide and free template.
This is one of the most important rules in packaging design.
Do not design an entire package and then try to force the artwork onto a manufacturer’s dieline afterward.
The dimensions, folds, glue areas, and panel positions can vary between suppliers.
If you are printing or assembling packaging yourself, you can instead start with a ready-made packaging template that matches your product dimensions.
Ready-made dielines can be especially useful for small businesses that want to customize packaging in Illustrator without building the entire structure from scratch. Explore our packaging templates and dielines, including the three-size candle box dieline bundle with editable AI files. These full-size box dielines require larger print sheets than A4.
Do You Need to Create the Dieline Yourself?
Not always.
For small businesses, the easiest workflow is usually:
Manufacturer provides dieline → you design artwork in Illustrator → manufacturer prints packaging.
Or:
Use a ready-made dieline → customize it in Illustrator → print and assemble the packaging yourself or through a local printer.
Creating structural packaging entirely from scratch requires more knowledge of packaging construction than simply designing artwork on an existing dieline.
Step 4: Open the Dieline in Illustrator
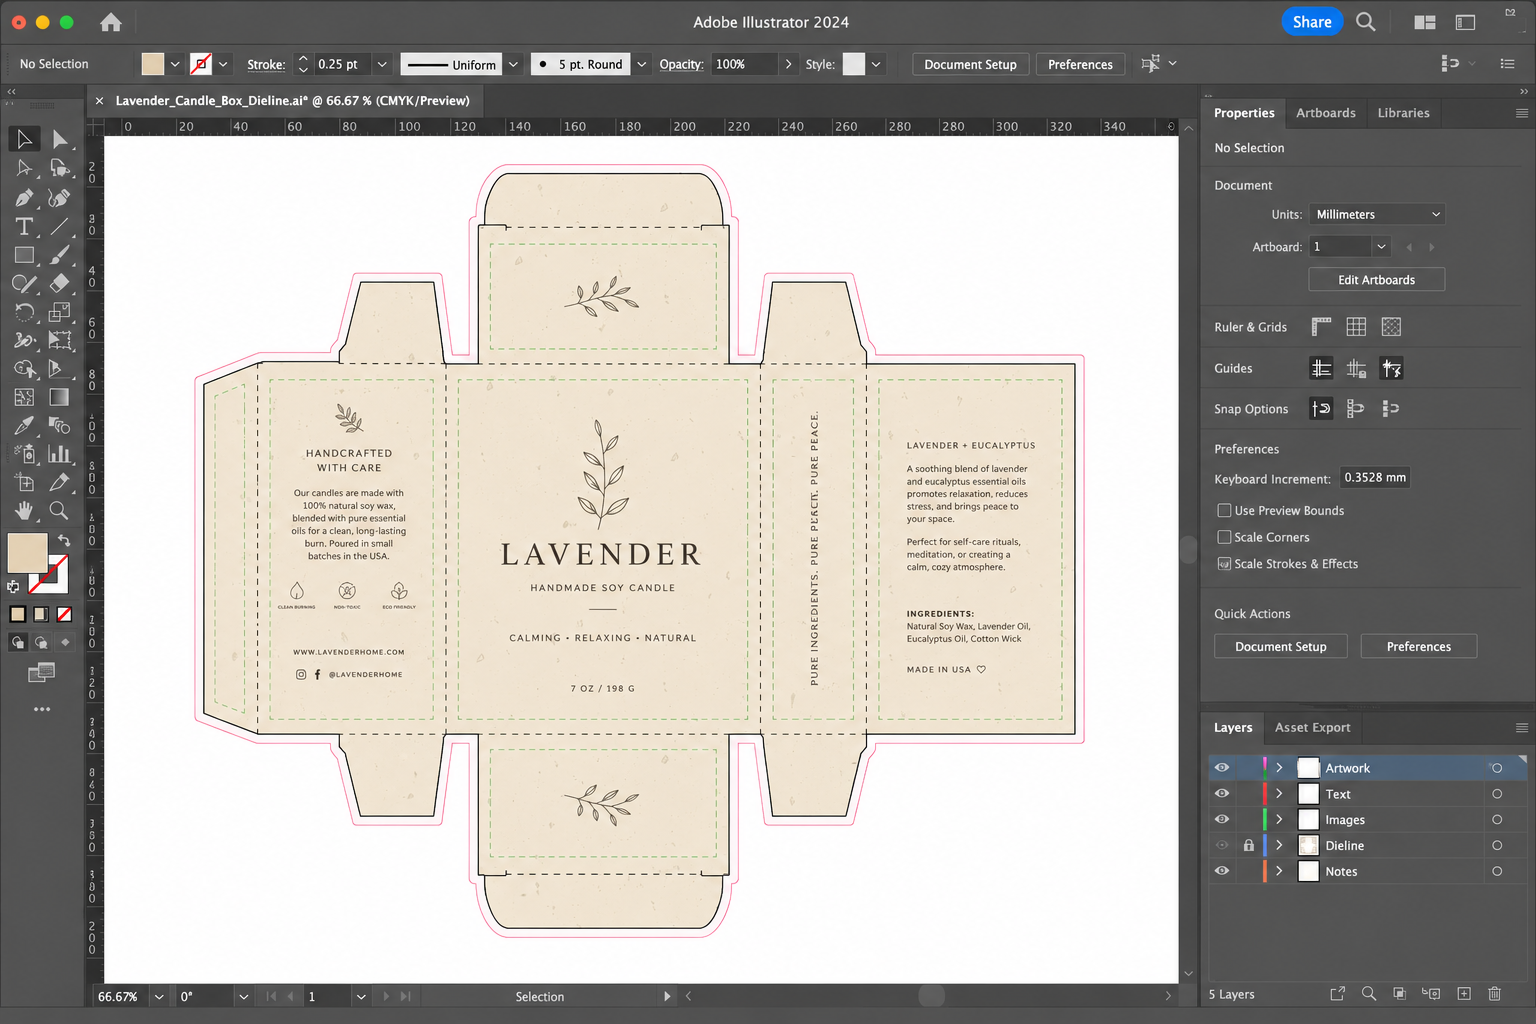
Once you have the correct dieline, open it in Adobe Illustrator.
Before adding artwork, inspect the file carefully.
Look for:
- Front panel
- Back panel
- Side panels
- Top and bottom flaps
- Glue areas
- Cut lines
- Fold lines
It may look confusing when you first see a flat packaging template.
A useful trick is to label the panels temporarily:
FRONT
BACK
LEFT
RIGHT
TOP
BOTTOM
You can remove these labels before sending the final file to print.
This simple step helps prevent one of the most common packaging mistakes: placing text or graphics upside down on a panel.
Step 5: Organize Your Layers
Before designing, create a clean layer structure.
For example:
Layer 1 – Dieline
Layer 2 – Artwork
Layer 3 – Text
Layer 4 – Images
Layer 5 – Notes
Keep the dieline separate from your artwork.
Once it is correctly positioned, lock the dieline layer so you do not accidentally move or resize it while designing.
Never casually resize a manufacturer’s dieline.
Changing the dieline dimensions can change the finished packaging size.
Step 6: Check Bleed and Safe Areas
Two of the most important concepts in print packaging are bleed and the safe area.
What Is Bleed?
Bleed is extra artwork extending beyond the final cut edge.
If your background color, photograph, or pattern reaches the edge of the packaging, extend it into the bleed area.
This prevents thin white edges from appearing if the cutting process shifts slightly.
What Is a Safe Area?
The safe area is the space inside the cut line where important information should remain.
Keep elements such as:
- Logo
- Product name
- Ingredients
- Important text
- Barcodes
away from cut edges and folds.
Your printer or packaging supplier may have specific bleed and safe-area requirements, so always use their specifications instead of assuming one measurement works for every project.
Step 7: Design the Main Packaging Panel First
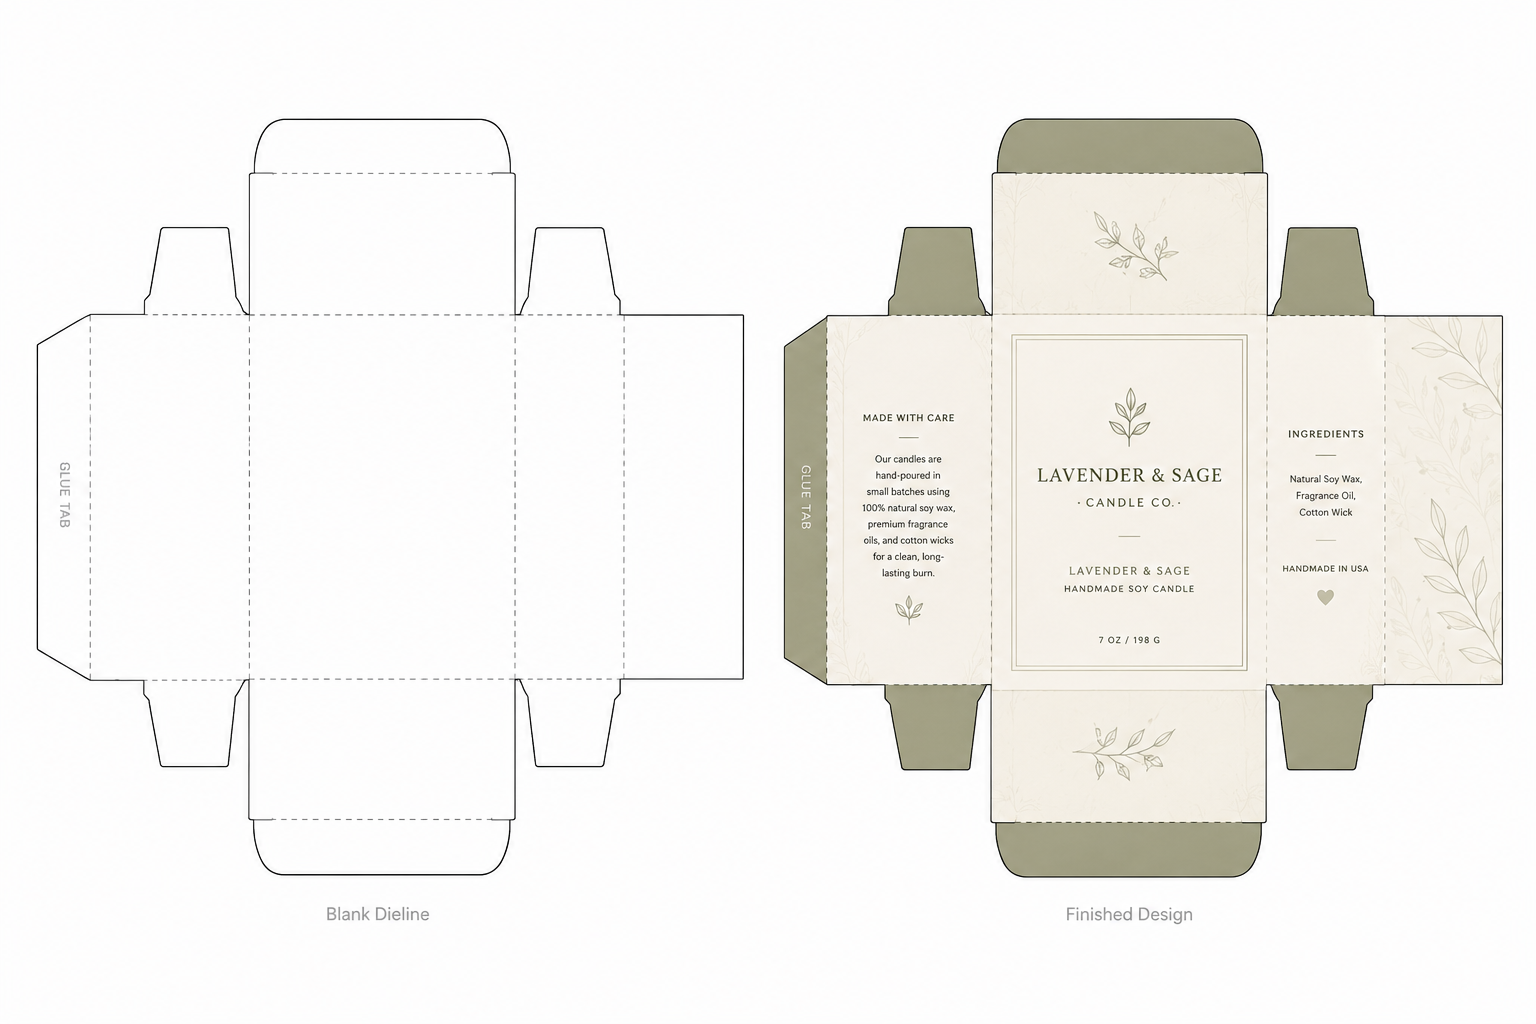
For most product packaging, start with the panel customers will see first.
Usually this is the front panel.
A simple front panel might contain:
Brand Name
Product Name
Product Type
Key Product Detail
Net Weight or Size
For example:
Wildwood Candle Co.
Cedar + Vanilla
Hand-Poured Soy Candle8 oz
Avoid trying to put every piece of information on the front.
Small-business packaging often looks more professional when the front panel is visually simple and supporting information is moved to the sides or back.
If you are still developing the visual direction of your packaging, these packaging design inspiration ideas can help you explore layouts, typography, color systems, and packaging styles before you begin designing on the final dieline.
Step 8: Add the Supporting Information
Once the front panel is complete, design the remaining panels.
Depending on your product, these could include:
Back Panel
- Product description
- Instructions
- Ingredients or materials
- Safety information
- Website
Side Panels
- Brand story
- Social media
- Product benefits
- Decorative patterns
- Additional instructions
Bottom Panel
- Barcode
- SKU
- Batch information
- Manufacturer information
The exact information required will depend on the product category and applicable regulations.
Do not use a generic packaging checklist as a substitute for checking the labeling requirements for the specific product you sell.
Step 9: Use CMYK Colors for Print
Digital screens display colors differently from most commercial printing processes.
Packaging designed only for screens can therefore look different once printed.
For print-focused artwork, you will commonly work with CMYK rather than RGB.
CMYK stands for:
- Cyan
- Magenta
- Yellow
- Black
Some packaging projects may also use Pantone or other spot colors.
Before finalizing your artwork, ask your printer what color setup they require.
If maintaining an exact brand color is important, request a physical proof instead of relying only on what you see on your monitor.
If terms such as CMYK, resolution, bleed, and print-ready artwork are still unfamiliar, read our guide to print design and printing for straightforward answers to common printing questions.
Step 10: Check Your Images
Illustrator is primarily a vector design program, but packaging projects can also contain photographs or raster images.
If you use product photography or other raster artwork, make sure the image has enough resolution at its final printed size.
Many commercial print workflows commonly use high-resolution images around 300 PPI at final size, but your printer’s specifications should always take priority.
Avoid enlarging small web images inside Illustrator.
An image can look acceptable on your computer and still print blurry.
Step 11: Check Your Fonts and Typography
Packaging often contains very small text.
Before printing, check:
- Font size
- Line spacing
- Contrast
- Font weight
- Text near folds
- Text near cut lines
Print a test version at 100% scale whenever possible.
Reading packaging on a large computer monitor is very different from reading it on a small candle box or soap sleeve.
If you need to zoom heavily on screen to read your text, the customer may struggle to read it on the actual package.
Step 12: Create a Physical Prototype
Do not skip this step.
Before ordering a large quantity of packaging, print a basic paper prototype.
It does not have to look beautiful.
The purpose is to check:
- Panel orientation
- Text size
- Fold positions
- Artwork alignment
- Barcode placement
- Product fit
- Overall proportions
Cut out the dieline, fold it, and place your product inside.
You may immediately notice problems that were impossible to see on the flat Illustrator file.
For a small business, spending a few minutes creating a prototype can prevent an expensive packaging order from being printed incorrectly.
How to Create a Packaging Dieline in Illustrator
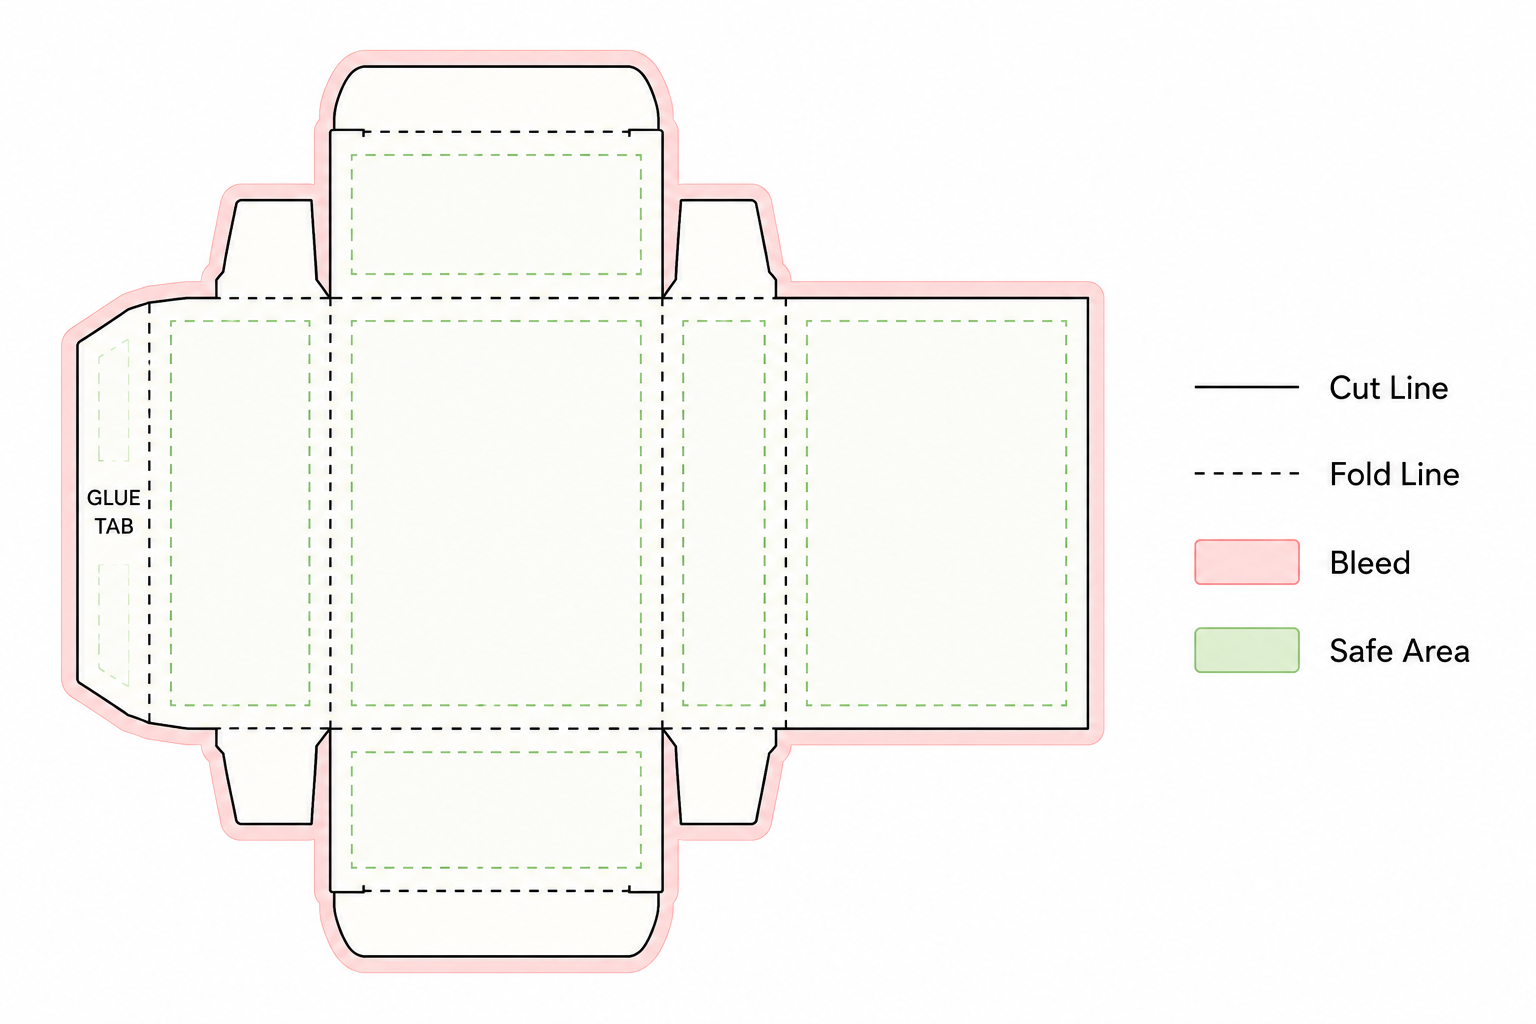
Sometimes you may need to create or modify a simple dieline yourself.
The basic process involves creating the flat structure of the package using exact measurements.
For a simple folding carton, you would typically define:
- Front panel
- Side panel
- Back panel
- Second side panel
- Glue tab
- Top flaps
- Bottom flaps
Use Illustrator’s measurement and alignment tools to keep each panel accurate.
Then separate structural information visually.
For example:
- Solid line = cut
- Dashed line = fold
- Separate spot color = special production instruction
However, there is an important distinction:
Creating a simple prototype dieline for your own small-batch project is not the same as engineering packaging for commercial manufacturing.
For custom-produced packaging, your printer or manufacturer should usually provide or approve the final production dieline.
This removes guesswork and reduces the risk of structural problems.
What Size Should Packaging Be in Illustrator?
The Illustrator artboard does not determine your final package size by itself.
The dieline dimensions determine the package dimensions.
For example, if your finished candle carton needs to measure:
3 × 3 × 4 inches
the flat dieline will be much larger because it must include:
- Four side panels
- Glue tab
- Top flaps
- Bottom flaps
- Bleed
This is why packaging files can look much larger than the finished box.
Do not simply create a 3 × 3 × 4-inch Illustrator artboard and assume you now have a box template.
You need the complete unfolded structure.
How to Prepare Packaging Artwork for Print
When your design is complete, perform a prepress check before exporting anything.
Packaging Print-Ready Checklist
Before sending your Illustrator packaging file to a printer, check:
- Correct dieline dimensions
- Artwork extends into bleed where necessary
- Important text stays inside safe areas
- Correct color mode
- Images are high enough resolution
- Logos remain vector where possible
- Fonts are handled according to printer requirements
- Barcode is readable
- No important artwork crosses glue areas
- Dieline remains on the correct layer
- Fold and cut instructions are clearly identified
- Hidden objects have been removed
- Spelling and product information have been checked
- Prototype has been reviewed
- Printer specifications have been followed
One more step is worth adding:
Ask the printer to confirm the artwork before production.
Packaging manufacturers work with different machines, materials, tolerances, coatings, and finishing processes.
Their specifications should always override a general online tutorial.
How to Export Packaging From Illustrator for Printing
The exact export settings depend on your printer.
Many printers request a print-ready PDF, but the required PDF standard and production settings can vary.
Before exporting, ask your printer:
- Preferred file format
- Required PDF preset
- Bleed requirements
- Crop mark requirements
- Font requirements
- Image resolution
- Color profile
- Spot color requirements
- Dieline requirements
Do not assume that every printer wants the same settings.
When possible, keep your original editable Illustrator file even after exporting the final PDF.
If the printer requests a change later, editing the original file will be much easier.
Adobe Illustrator vs Canva vs Pacdora for Packaging Design
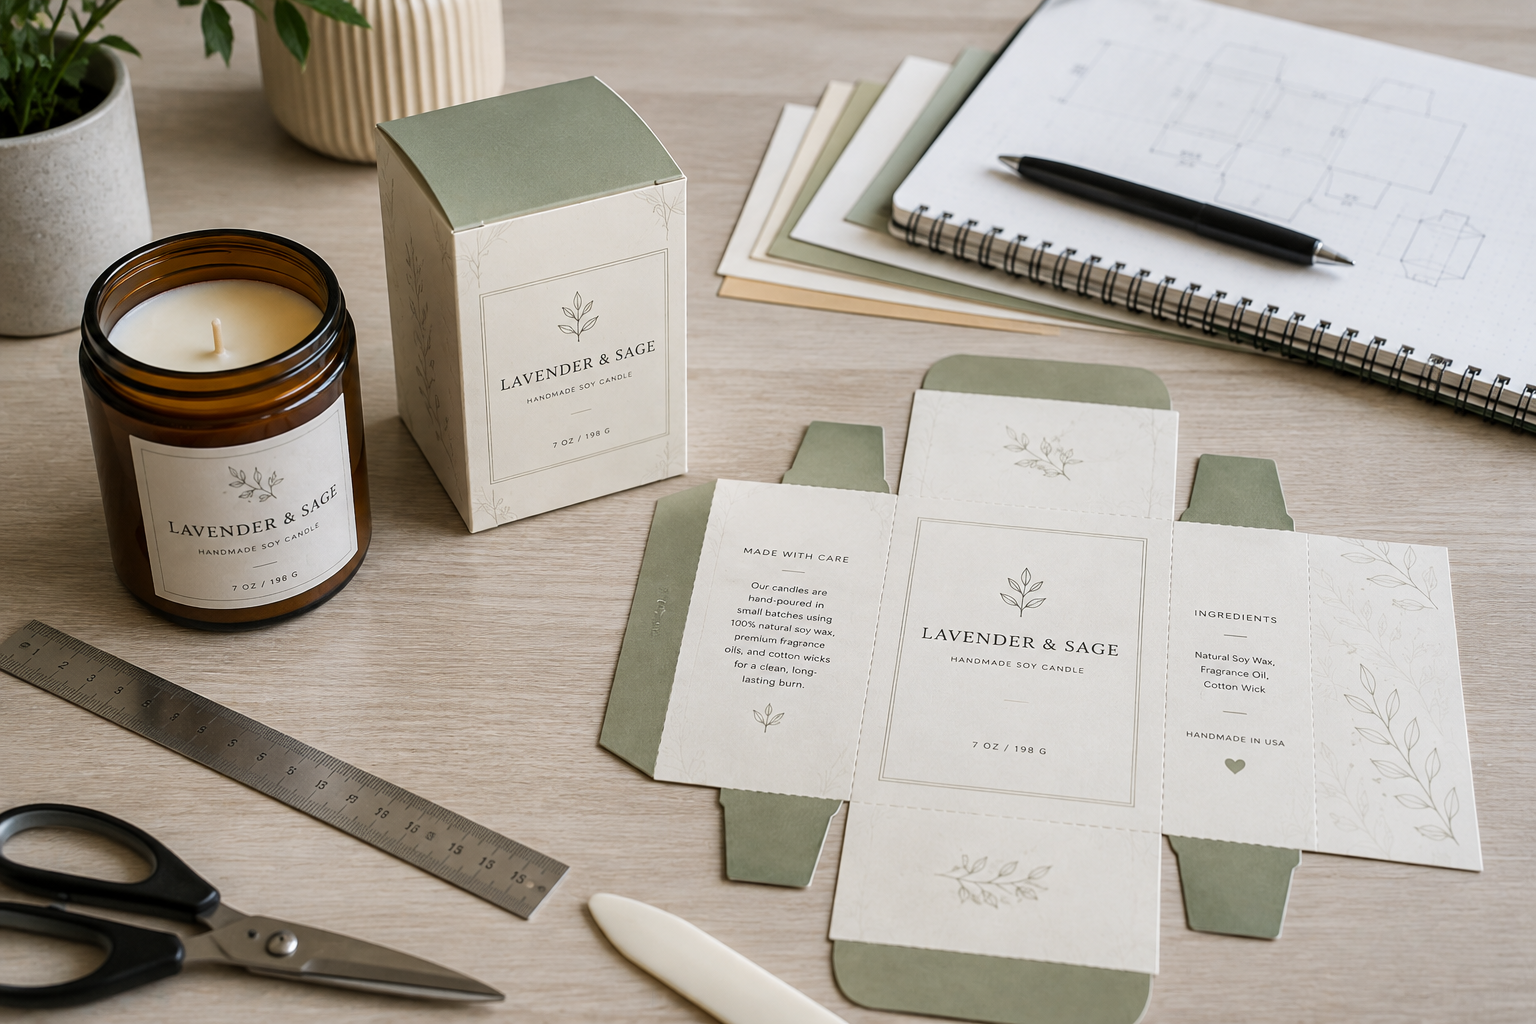
Small businesses now have several ways to design packaging, and Illustrator is not automatically the best choice for every project.
| Tool | Best For | Main Advantage |
|---|---|---|
| Adobe Illustrator | Professional print artwork | Precise vector and print control |
| Canva | Simple DIY designs | Easy for beginners |
| Pacdora | Packaging templates and mockups | Faster packaging visualization |
Choose Illustrator If:
- You need professional print-ready artwork
- Your printer provided an Illustrator dieline
- Your packaging has multiple panels
- You need precise typography and vector graphics
- You want complete control over your design
Choose Canva If:
- You are creating a simple label or insert
- You are uncomfortable with professional design software
- You mainly need basic graphics and text
- You are working with ready-made packaging rather than complex custom cartons
For a deeper look at where Canva works well—and where its limitations begin—read our complete guide to Canva for packaging design.
Choose Pacdora If:
- You need packaging dielines quickly
- You want to preview packaging in 3D
- You are testing packaging concepts
- You want to create mockups before committing to production
Many small businesses may actually use more than one tool.
For example:
Pacdora for dieline and mockup → Illustrator for final artwork → printer for production.
Or:
Canva for simple branding → Illustrator for final print preparation.
The best tool depends on where your packaging project becomes technically complex.
If dielines and realistic 3D packaging previews are your main priority, read our full Pacdora review to see how the platform fits into a small-business packaging workflow.
Common Illustrator Packaging Design Mistakes
1. Designing Before Getting the Dieline
This often forces you to redesign the entire package later.
Get the packaging dimensions and dieline first.
2. Putting Important Text Too Close to the Edge
Cutting and folding are not perfectly identical on every unit.
Keep important information inside the safe area.
3. Forgetting Bleed
Background colors and images should extend beyond the cut line when they are intended to reach the edge.
4. Designing Everything in RGB
Screen colors can look different in print.
Prepare colors according to the printer’s requirements.
5. Using Low-Resolution Images
A small online image may look acceptable on screen but print poorly.
6. Moving the Dieline Accidentally
Lock the structural layer before designing.
7. Ignoring Panel Orientation
Text may end up sideways or upside down once the box is assembled.
Create a paper prototype.
8. Ordering Too Much Packaging Before Testing
Small businesses do not need to begin with thousands of custom boxes.
Test dimensions, artwork, materials, and customer response before increasing quantities.
Is Adobe Illustrator Worth It for Small Businesses?
a Small Business?
Illustrator is worth considering when packaging is becoming an important part of your brand and you need more control than basic online design tools provide.
It can be particularly valuable for a growing handmade or product-based business that frequently creates:
- New product labels
- Seasonal packaging
- Product boxes
- Inserts
- Stickers
- Packaging sleeves
- Print marketing materials
However, a new business does not need complicated custom packaging simply because Illustrator makes it possible.
Start with the packaging problem you actually need to solve.
If a stock kraft box plus a professional label gives your candle brand the look you need, that may be a better use of your budget than ordering custom printed cartons.
As the business grows, Illustrator becomes more valuable because you can maintain consistent branding while creating more sophisticated packaging.
Professional packaging does not necessarily mean expensive packaging.
It means choosing the right structure, presenting the brand clearly, and preparing the artwork correctly.
A Simple Packaging Workflow for Small Businesses
If the entire process still feels complicated, use this workflow:
1. Measure your product
↓
2. Choose the packaging type
↓
3. Get the dieline or packaging template
↓
4. Open the dieline in Illustrator
↓
5. Add your brand artwork
↓
6. Set bleed, colors, images, and typography
↓
7. Print a prototype
↓
8. Correct any problems
↓
9. Export the print-ready file
↓
10. Ask your printer to approve the artwork
That is the core workflow behind most small-business packaging projects.
You do not need to master every feature in Illustrator before designing your first package.
Learn the tools required for the project in front of you.
Why You Can Trust Busho Designer
Busho Designer focuses on practical packaging, printing, labeling, and design solutions for small product-based businesses.
The goal is not to make packaging more complicated than it needs to be.
Instead, the focus is on helping small businesses create packaging that is:
- Professional enough to represent the brand well
- Practical to produce in small quantities
- Compatible with real printing workflows
- Flexible enough to grow with the business
- Affordable without requiring a large manufacturing order
That is why this guide does not recommend custom manufacturing for every business.
For many candle makers, soap businesses, jewelry brands, bakeries, and other handmade businesses, starting with stock packaging, professionally designed labels, sleeves, or inserts may be more practical than ordering thousands of custom boxes.
When technical print specifications are involved, always confirm the final requirements with your printer or packaging manufacturer before production.
Need a Packaging Dieline Instead of Starting From Scratch?
Creating packaging artwork is much easier when the structural template is already prepared.
If you are designing your own packaging in Illustrator, a ready-made dieline can help you skip the most technical part of building the box structure and focus on your branding instead.
Busho Designer packaging templates are designed for small businesses that want editable packaging files without starting every dieline from a blank Illustrator document.
They can be useful for:
- Candle packaging
- Soap packaging
- Bakery packaging
- Product sleeves
- Small folding cartons
Before choosing any template, always compare its finished dimensions with the actual product you plan to package.
Start with the product size first—not the design.
What Should You Do Next?
Your next step depends on where you are in the packaging process.
If You Still Need the Right Design Software
Compare the best packaging software for small businesses to decide whether Illustrator, Canva, Pacdora, or another tool fits your workflow.
If You Need a Packaging Template
Start with a dieline that matches your product dimensions rather than drawing a box from scratch.
If You Mainly Need Labels
You may not need custom printed packaging yet.
A stock box combined with professionally designed labels can often provide a polished look at a much lower cost.
Explore the best label makers for small business if you plan to print labels in-house.
If You Are Preparing to Print
Review your artwork one final time for:
- Dieline dimensions
- Bleed
- Safe areas
- CMYK or required color settings
- Image resolution
- Fonts
- Barcode placement
- Fold orientation
Then send the file to your printer for approval before placing the full order.
Final Verdict: Is Illustrator a Good Choice for Small-Business Packaging?
Adobe Illustrator is one of the strongest choices for small businesses that need precise, professional, print-ready packaging artwork.
It gives you significantly more control than beginner design tools when working with dielines, vector graphics, typography, colors, and commercial print files.
But that does not mean every small business needs to start with Illustrator or custom packaging.
For a new handmade brand, the smartest path may be:
Stock packaging + custom label → branded sleeve or insert → custom printed packaging as sales grow
For a growing business with established products and repeat packaging sizes, Illustrator becomes much more valuable because the same branding system can be adapted across boxes, labels, inserts, sleeves, and other print materials.
The goal is not to create the most complicated packaging possible.
The goal is to create packaging that fits your product, your brand, your printing method, and your current budget.
Start simple. Test the packaging. Improve it as the business grows.
Designing Stickers and Product Labels in Illustrator
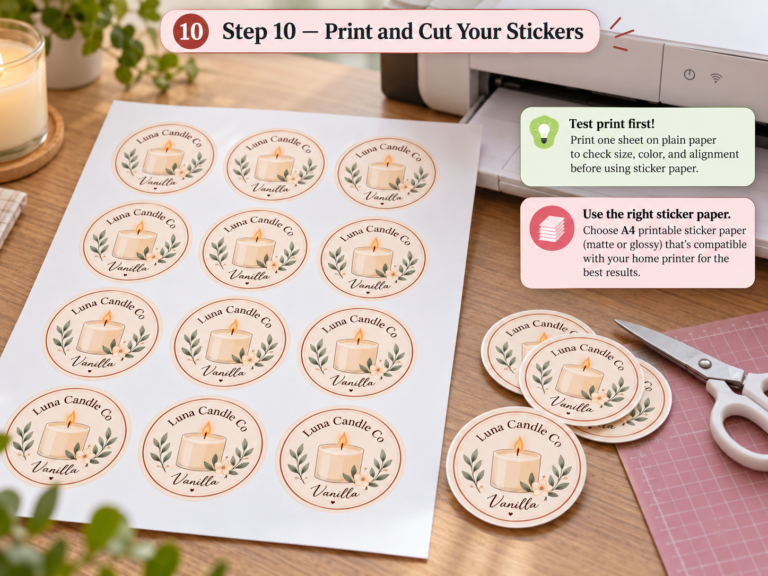
Illustrator is also useful for product stickers and labels because it gives you precise control over dimensions, vector artwork, bleed, cut paths, and print-ready exports. For a practical walkthrough, follow our step-by-step guide to making stickers in Adobe Illustrator.
If you need faster 3D packaging mockups or automatic dielines instead of building the entire workflow in Illustrator, compare our best Pacdora alternatives for packaging design.
Frequently Asked Questions
How do I design product packaging in Illustrator?
Start by measuring your product and getting the correct packaging dieline. Open the dieline in Illustrator, keep the structural lines on a separate locked layer, add your branding and product information, check bleed and safe areas, create a physical prototype, and then export the artwork according to your printer’s requirements.
How do you make a package in Illustrator?
Illustrator can be used to create both packaging artwork and simple dielines. For commercial packaging, however, it is usually safer to obtain the production dieline from your printer or packaging manufacturer and design your artwork on top of it.
How do I make a box design in Illustrator?
Start with a box dieline that matches your product dimensions. Lock the dieline layer, identify each box panel, add your branding and information, extend edge-to-edge graphics into the bleed, create a paper prototype, and prepare the final artwork according to your printer’s specifications.
What are the basic steps in packaging design?
The basic process is to define the product requirements, choose the packaging structure, get or create the dieline, develop the visual design, prepare the artwork for print, create and review a prototype, and then send the approved files to production.
Can beginners use Illustrator for packaging design?
Yes. Beginners do not need to learn every Illustrator feature. Start with basic skills such as working with layers, text, vector graphics, colors, alignment, dielines, and PDF export. Using a ready-made dieline also makes the process considerably easier.
If your project starts with the box structure rather than the artwork, see the Sustainable Packaging Structural Design guide for material efficiency, glue-free structures, dieline planning, and sheet optimization.
Best Adobe Illustrator Plugins for Packaging Design
Illustrator can handle most packaging artwork on its own, but packaging plugins can speed up structural design, dieline setup, prepress checks, and 3D packaging workflows. Tools from established packaging software vendors are commonly used by professional teams when they need more automation than standard Illustrator provides.
Two established Adobe Illustrator packaging plugin options are Esko DeskPack and EngView Illustrator Integration. Esko DeskPack is aimed primarily at packaging prepress and production workflows, with tools for barcode generation, preflight, trapping, step-and-repeat, variable data, and print-ready file preparation. EngView is more focused on connecting Illustrator artwork with structural packaging drawings, resizing designs, applying graphics to dielines, and checking the result in 3D.
For small businesses and independent designers, a plugin is usually most useful when you regularly build custom dielines, manage many packaging SKUs, or need tighter prepress control. If you mainly edit supplied dielines and create print-ready artwork, Illustrator alone is often enough.
Final Thoughts
Adobe Illustrator gives small businesses the ability to create packaging that looks professional without giving up control of the design process.
The key is not learning every Illustrator tool.
It is understanding the packaging workflow.
Start with your product dimensions. Choose packaging that makes sense for your budget and shipping method. Get the correct dieline. Build your artwork carefully. Test the package physically. Then prepare the final file according to your printer’s specifications.
For a candle maker, soap business, jewelry brand, bakery, or other product-based small business, this approach makes it possible to improve packaging gradually instead of jumping immediately into expensive custom manufacturing.
And that is usually the smarter way to build a packaging system:
Start simple, test what works, and upgrade the packaging as the business grows.